Friday, March 30, 2018

“Cerebral palsy won’t stop me becoming a lawyer”

Disabilities In The News is a regular feature in which we present important and exciting news stories covering disabilities in the UK.


disabilities in the news 2


We came across the brilliant story of Daniel, a student with Cerebral Palsy who is studying to become a Lawyer.

Video property of the BBC

Great Stuff!

Gepostet von A2B Assessments am Freitag, 30. März 2018

Thanks,

A2B DSA Assessment Centre

The post “Cerebral palsy won’t stop me becoming a lawyer” appeared first on A2B Assessments DSA Needs Assessment Centre.

Friday, March 23, 2018

Scientists Cure Most Common Cause Of Blindness

This is the first post in our new category – Disabilities In The News. In this regular feature we will present important and exciting news stories covering disabilities in the UK.


disabilities in the news 2


In the next five years, the most prevalent cause of blindness may have a common cure. Scientists believe this will be possible after performing a ground breaking medical procedure on two patients.

Doctors performed stem cell therapy on both patients and the procedure was a success. The patients suffered from a condition known as AMD which had advanced (due to macular degeneration which is age-related.) This condition tends to destroy the central vision. The surgeon that operated on them said that the two patients were on the verge of losing their sight and that they could neither see a book nor any printed letters. Thanks to a stem cell “patch” that has been implanted behind their eyes, their central vision is now restored. Both patients currently have a clear vision, they can read and see faces clearly.

The scientist behind this marvellous achievement foresees this procedure becoming quite common in the near future. It will almost be like cataract surgery. Nearly 600,000-700,000 people in the United Kingdom lose their sight courtesy of AMD. These people now have hope thanks to this procedure.

This achievement was accomplished thanks to the tireless efforts of Pete Coffey, a university college London professor and Da Cruz, a Moorfields Eye Hospital retinal surgeon. Their aim was to treat at least ten people who suffered from the AMD condition that is in “wet” form. The cause of this condition is attributed to the eye’s blood vessels leaking which destroys the macula which is the retina’s integral part. Crucial macula cells known as retinal pigment epithelial are essential in the functioning of photoreceptor cells which are light sensitive. Without the RPE (retinal pigment epithelial) cells support, the photoreceptor cells die.

The two patients that underwent the treatment were the first from the United Kingdom. They were chosen due to the advancement of their AMD condition. The patients were male and female and are in their 60’s and 80’s. Had they not undergone the procedure in due time, they would have lost their sight within a month and a half of their blood vessels leaking.

Going Forward

According to Coffey, an off-the-shelf treatment will be available for use by NHS surgeons within five years. Currently, it can only be used on around 10% of the patients that suffer from AMD’s wet form. Currently dry AMD, which develops slowly cannot be treated. Coffey, however, does not see a reason as to why the patch wouldn’t work for them. The team anticipates that eventually, the treatment will become as cheap and common as cataract surgery.


Return back to A2B Assessments

The post Scientists Cure Most Common Cause Of Blindness appeared first on A2B Assessments DSA Needs Assessment Centre.

Tuesday, March 20, 2018

A Tribute To Stephen Hawking

You can never talk about the world of science without recognising the great minds that shaped this field and brought about the advancements we have today. Some of the scientists who pioneered ground shaking discoveries and theories include the likes of Albert Einstein and Sir Isaac Newton, whose legacies still live on. One modern scientist who has gained similar standing in the world of science is none other than the late Stephen Hawking.

Stephen was born on Jan. 8 1942 to Isobel and Frank Hawking. Notably, both parents were also intellectuals, having attended the University of Oxford. Stephen found his studies rather easy, including university education and this can be attributed to his impeccable intellectual capacity. However, in his early 20s, he was diagnosed with motor neuron disease which would see him confined to a wheelchair for the rest of his life. This diagnosis gave him a few years to live, at least according to his doctors, but he defied the odds and lived to the age of 76. This physical incapacitation did not slow his mental strength and from that chair, he made many astonishing contributions to the world. He was ranked as one of the smartest people to ever live and among the most influential when it comes to the world of modern science.

Yes, he was bound to a chair but his mind was as free as the wind. He made his most notable contributions in the field of cosmology in which he held a Ph.D. from Cambridge University. This led to him writing one of the bestselling books, ‘A Brief History of time’. In the book, he sought to explain space and time to the masses.

Another fascinating aspect of Hawking’s life was his use of assistive technology, most notably his wheelchair. His fading abilities due to ALS had led to the continuous upgrading of his wheelchair. This was enabled by Intel’s communication system installed on the chair’s computer. The computer was powered by the batteries stored in the wheelchair and the computer cursor was moved by his cheek. This was made possible by the use of an infrared camera set up in his glasses which detected cheek movement.

The life of Hawking was further showcased through a film produced in his honour. The Theory of Everything is the very film produced as an accolade to Stephen Hawking (portrayed by Eddie Redmayne). It looks at the life and relationship of the physicist and his wife Jane, as well as the events in his life culminating to his later contributions in the world of science. It premiered at the end of 2014 in the US and beginning of the succeeding year in the UK. The movie was extremely well received and it won many awards, including an Academy Award for the best actor.  Hawking was also a big fan of the Simpsons and he featured in 4 different episodes where he actually voiced himself, using his assistive technology. In a Tribute to Stephen Hawking they also honoured his memory in their most recent episode.

Some of his memorable quotes include:

‘Science is not only a discipline of reason but, also, one of romance and passion’,

‘Work gives you meaning and purpose and life is empty without it’

‘People won’t have time for you if you are always angry and complaining’

‘We are just an advanced breed of monkeys on a minor planet of a very average star. But we can understand the Universe. That makes us something very special.’

Conclusively, Stephen Hawking has been a major source of inspiration for us all. Sadly, the world has lost a selfless genius but his works and legacy will echo through the halls of time for years to come.


tribute to stephen hawking

Image owned by Fox


Sincerely,  A2B Assessments

The post A Tribute To Stephen Hawking appeared first on A2B Assessments DSA Needs Assessment Centre.

Thursday, March 15, 2018

Free Software Showcase – Zotero

Welcome to another instalment of the A2B Software Showcase.

The Free Software Showcase is one of our regular features in which we take a look at some of the best free accessibility software available.

TODAY WE WILL BE LOOKING AT THE FREE SOFTWARE ZOTERO


free software zotero


In today’s world, content writing and research have gained center stage as people work hard to produce, distribute and acquire information for different reasons, be it personal, educational or commercial. In light of this, dozens of software to assist in keeping track of research and referencing has been created. The small issue, however, is that most of them are provided for a fee.

One game-changing software that has been introduced is the Zotero referencing software which is completely FREE. Due to the fact that its free software, the lingering question has been, is it equally reliable, what does it do, where do I get it and how do I make use of it?

All these burning questions are covered in this blog post.
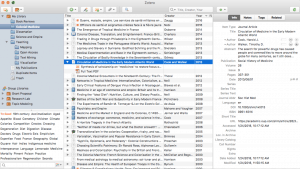
 

1. How Zotero works

Zotero has a myriad of useful features when it comes to your content;

(i) You can organise your research in any way you feel like. You can sort research into collections and tag with keywords.

Alternatively, you can also create saved searches which will fill relevant information as you work.

(ii) Citation – If you are in education you will find this very useful as it automatically creates bibliographies and references for the different text editors and handles over 8,000 citation styles.

(iii) Data synchronisation- Zotero lets you synchronise your information across devices thus ensuring your information is up to date.

(iv) If you need to share information with your colleagues or peers (e.g if you are working in a group) , Zotero will enable it without any restrictions.

free accessibility software zotero


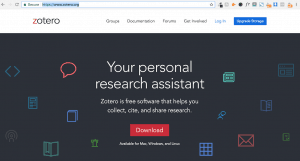
2. Where to download Zotero

With the many sources on the internet, knowing of the right place to get the software is of paramount importance. It’s always a relief if you are able to download something direct from the source without having endless redirections to other foreign sites. With this Free Software, the number one place should undoubtedly be the parent site which is www.zotero.org

download zotero


3. Installation process

(i) On a Mac- Open the downloaded .dmg file and drag Zotero to the application folder. From here, you can choose to run it from launchpad, spotlight or app folder and later add it your Dock.

(ii) With Windows, it’s pretty straightforward. Open the download folder and simply run the program.

(iii) With Linux- if you downloaded the tarball, you will need to unzip and then run Zotero on that same directory.

Updating the software is necessary to ensure that any new features are available for you. Updating is automatic by default, if for some reason your version doesn’t automatically update; you can go to the help menu on the software and click ‘check for updates’.


4. Some tips on getting started with Zotero

After you have downloaded and installed the software, you now need to know how to use it. Due to the many functions included in Zotero, we are unable to cover everything in this blog post, but here are some tips to get you started;

(i) Archiving a page- Click on the ‘create a new item from current page’ and your page will be archived.

(ii) Capturing bibliographic information- If you looking on the online library record for a book, Zotero book icon will appear on the Firefox browser and you only need to click it and it will save all citation info about the book.

(iii) Easy and precise searching- With searching, click and type in the search bar at the top of the middle column. As you type, the software narrows down to items like books and articles that only contain your search term.

(iv) Bibliographies- To create your required bibliography, highlight your references and right click (on
Windows) or control-click (on Mac) to choose ‘create bibliography’ and then select your preferred citation style.

By following these steps from downloading to usage, working your way around Zotero for the first time will be much easier.

Get Zotero

Book a DSA Assessment

The post Free Software Showcase – Zotero appeared first on A2B Assessments DSA Needs Assessment Centre.

Monday, March 12, 2018

Accessibility Tools On Mac OS X

Following on from our previous article looking at the built in accessibility tools on Windows. Today we will be looking at the built in accessibility tools available to Mac owners. Like Windows, the Mac OS has many built in accessibilty tools.

accessibility tools on mac 1

1. Display
The Display feature allows you to change the colour scheme of your Mac. For people with a visual impairment or visual stress this can be a game changer. You can invert the colours, alter the contrast and change the mouse curser size. In order to enable this function, click on Apple menu, select System preference then Accessibility and you will find Display listed at the top.

accessibility tools on mac 2

2. Zoom Tool
If you have a visual impairment, when using a computer, you may sometimes find the content displayed a bit too small and hard to see. In such an instance, the zoom tool will come in handy, magnifying the content. In order to enable this function, click on Apple menu, select System preference then Accessibility and you will find zoom listed. Select it and choose your preferred zoom percentage.

3. Text to speech and dictation
This function enables you to communicate with your MAC by spoken word. Starting dictation is quite easy. When in a text area like an address bar or text document, you just need to press ‘Fn’ key twice (located bottom left of keyboard) and the function will be enabled. When you’re done, just click the Fn key once and it will be disabled. 
Also, if you need text read aloud, select the text and enable the function through a keyboard shortcut which by default is option+ Esc.

4. Voice over
For the visually impaired, this can be considered as the most important tool from the Accessibility Tools On Mac Os. Its main purpose is describing what is happening on the screen while you use the keyboard. 
It also reads text on documents, internet pages and more. Different from other accessibility tools, this tool requires a bit of learning in order to use it efficiently. A refreshable Braille can also be connected for use with the voice over tool. To access this essential tool, click Apple menu, then System preference, Accessibility and you will find it at the bottom right of the panel.

dsa needs assessment accessibility 1

5. Assistive device
With a MAC, you are able to control it with ease using the assistive devices. The two main are;
(a) Switch control- It enables you to use adaptive devices in entering text and also eases the interaction with items on the screen.
(b) Dwell Control- It’s main purpose is enabling you to use tracking devices to control your mouse. 
The two named controls are also used for controlling your Mac. To access assistive devices, just click on the Apple menu, System Preferences then Universal access and you will find the ‘enable access for assistive devices’ checkbox.

6. Keyboard Sticky keys
Sometimes it gets overwhelming having to use a combination of keys to make certain actions on your computer especially if you have a lot to do with that combination. One way of easing this is by enabling sticky keys on your Mac. When sticky keys are enabled, you can press keys sequentially rather than simultaneously. There are two main ways of enabling sticky keys;
(a) Click apple menu, system preferences then universal access. From here, click on keyboard and you will see the checkbox for sticky keys.
(b) This is the simpler method as you only have to press shift key five times and sticky will be turned on. Turning off is simply pressing the same key five times again.

7. Reducing Motion
Once in a while, you may find the motion on your screen a bit of an issue. To correct this, try reducing it when using features such as the dock and notification area. To do this, go to Apple menu, Select system preferences then Accessibility and click on display. 

8. Moving mouse with the keyboard
This is one tool you will find useful if you find it hard to use the mouse. The option allows you to move the mouse using your keyboard. To activate it, click on Apple menu, then select System preference, Accessibility and select mouse and Trackpad.

We hope you enjoyed our overview of the built in accessibility tools on Mac OS X.

Book a DSA Needs Assessment

The post Accessibility Tools On Mac OS X appeared first on A2B Assessments DSA Needs Assessment Centre.

Tuesday, March 6, 2018

Accessibility Tools On Windows OS

Windows is probably the operating system that has gained the most traction when it comes to the world of computing, with Macs catching up in more recent years. The number of users on Windows has already hit the billion mark and still growing. However, most people only use it for routine purposes without the knowledge of other available useful features. In this blog post, we are going to have a look at the different accessibility tools on windows and their use.

Let’s dive in to the free accessibility tools on Windows:

1. Magnifier
This tool was developed to assist users with impaired eyesight or for use if you need to focus on certain areas on the screen for whatever reason. To open this tool, go to start, select settings, then ease of access and you will find magnifier which you can select. For earlier versions like Windows 7, click on start, control panel then ease of access, and finally ease of access center where you will find it. You can also access the ease of access centre on some computers by hitting windows + U on your keyboard.

a2b assessments blog ease of accessaccessibility tools on windows

2. Narrator
Narrator reads aloud dialogue boxes and windows controls from the most commonly used applications. In Windows 7, the narrator uses the English language but in windows 7 ultimate and other editions for China, there is the inclusion of 
Chinese. In later versions like Windows 10, an array of languages like French, Italian and Russian among others has been included. The only requirement is for your computer to be equipped with a soundcard and headphones or speakers. You can access it via the same process as the magnifier tool since from the ease of access center, you will find it on the same list.

accessibility tools on windows-2

3. High Contrast
High Contrast allows you to have certain parts of your screen in hi-vis mode. This option is especially useful if you are going to use the computer outdoors or for people with colour sensitivity. With this tool, you have four options of high contrast themes. This includes high contrast #1, #2, black and lastly white. After your selection, you can modify selected text, disabled text, button text and background as per your liking. To locate High Contrast go to start select settings then ease of access and lastly high contrast.

4. Speech recognition
Windows now also has built in speech recognition. This is almost like a stripped down version of Dragon and it actually works quite well. It is a handy tool that helps you communicate with your computer and give it commands by word of mouth. You can dictate documents, surf the web and even navigate using just your speech. To find this tool, go to start, control panel, ease of access and you will find the speech recognition. After selecting it, you will be taken through the process of setting it up.

5. Closed captions
Do you have problems following through subtitles in movies and TV shows? Well, closed captions is here for you. It simply lets you edit the background and colors on your subtitles. This options works on supported media players. To manage it click start, then settings, ease of access and then closed captions.

6. Keyboard
There are several functions associated with the keyboard;

a. Sticky keys- This lets you press and release one key at a time instead of having to hold it down. For instance, to copy, press control, release it, then press C. 
b. On-screen keyboard- Displays keyboard on the screen and you can control it with the mouse.
c. Toggle keys- You get to hear a sound anytime you press the toggle keys.
You can find the keyboard setting by using the same process as magnifier tool and you will find it on the list in ease of access.

7. Mouse
This tool enables you to change the size of the mouse pointer, color and other minor things like allowing the numbers pad to move the mouse. This tool is found next to keyboard tool and the process of accessing it is the same above!

Thanks for reading!

We will be back later in the week looking at the built in accessibility tools available on the Mac operating system.

A2B DSA Assessment Centre Home

The post Accessibility Tools On Windows OS appeared first on A2B Assessments DSA Needs Assessment Centre.

Friday, March 2, 2018

Free Software Showcase – Grammarly

Welcome to the A2B Software Showcase.

The Free Software Showcase will be a regular feature in which we take a look at some of the best free accessibility software available.

TODAY WE WILL BE LOOKING AT THE FREE (AND PAID) SPELLING AND GRAMMAR ASSISTANT GRAMMARLY

free accessibility software

Are you confident in your writing skills?

Do you often find errors in your written work?

Grammarly is a software that checks the grammar in any written document and highlights grammatical errors. In addition, it gives you reasons for the errors and offers suggestions for corrections. Making it even better is the fact that you can also check the spelling, punctuation and even plagiarism in your document. 

HOW TO GET GRAMMARLY

Installing Grammarly is relatively easy. Simply visit the Grammarly website where you can quickly subscribe. For the Chrome plugin, just click here and you will get a link where you can download and install it. You need to have Google Chrome already installed.

You can also get the Grammarly keyboard on your mobile phone or tablet that will check as you type and correct possible mistakes. For this, you need to search the Google Playstore or the Apple App Store depending on your device’s operating system.

You can use the Grammarly plugin for Microsoft Office or run your analysis online. For the Chrome plugin – You can type a new document and after a short while, Grammarly will underline grammar mistakes the same way it is done in Microsoft Word. You also get an in-depth explanation of the causes of the errors and suggestions for corrections.

Grammarly comes in the free and paid versions. The free version offers better than average proofreading features. For an intermediate or advanced writer, it is okay to stick to the free version. It will help you check through some errors that you could have missed and give you suggestions on how to rectify them. 

HOW TO USE GRAMMARLY

You can use the Grammarly plugin for Microsoft Office or run your analysis online. For the Chrome plugin – You can type a new document and after a short while, Grammarly will underline grammar mistakes the same way it is done in Microsoft Word. You also get an in-depth explanation of the causes of the errors and suggestions for corrections.

Pros of Grammarly

– The fluent mastery of the language will help keep your documents error-free.
– The software checks all the pages being visited and corrects mistakes in all of them. These include your email and social media sites.
– East to switch between US and British English. 

Cons of Grammarly
– For some, the cost of the paid version which contains further features is a bit high
– The software is not perfect and cannot replace a human proof-reader. 

All in all, Grammarly is an amazing piece of free accessibility software that will definitely help improve your mastery of the English language while greatly minimising errors in your documents.

Visit Grammarly

Book a DSA Needs Assessment

The post Free Software Showcase – Grammarly appeared first on A2B Assessments DSA Needs Assessment Centre.