Following on from our previous article looking at the built in accessibility tools on Windows. Today we will be looking at the built in accessibility tools available to Mac owners. Like Windows, the Mac OS has many built in accessibilty tools.
1. Display
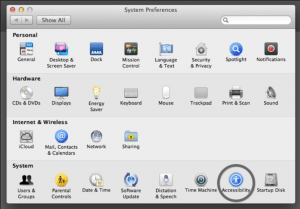
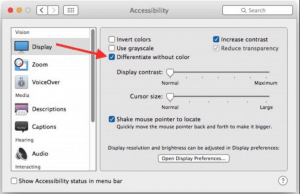
The Display feature allows you to change the colour scheme of your Mac. For people with a visual impairment or visual stress this can be a game changer. You can invert the colours, alter the contrast and change the mouse curser size. In order to enable this function, click on Apple menu, select System preference then Accessibility and you will find Display listed at the top.
2. Zoom Tool
If you have a visual impairment, when using a computer, you may sometimes find the content displayed a bit too small and hard to see. In such an instance, the zoom tool will come in handy, magnifying the content. In order to enable this function, click on Apple menu, select System preference then Accessibility and you will find zoom listed. Select it and choose your preferred zoom percentage.
3. Text to speech and dictation
This function enables you to communicate with your MAC by spoken word. Starting dictation is quite easy. When in a text area like an address bar or text document, you just need to press ‘Fn’ key twice (located bottom left of keyboard) and the function will be enabled. When you’re done, just click the Fn key once and it will be disabled.
Also, if you need text read aloud, select the text and enable the function through a keyboard shortcut which by default is option+ Esc.
4. Voice over
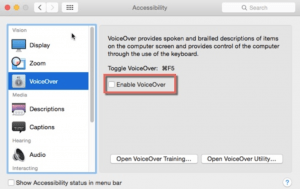
For the visually impaired, this can be considered as the most important tool from the Accessibility Tools On Mac Os. Its main purpose is describing what is happening on the screen while you use the keyboard.
It also reads text on documents, internet pages and more. Different from other accessibility tools, this tool requires a bit of learning in order to use it efficiently. A refreshable Braille can also be connected for use with the voice over tool. To access this essential tool, click Apple menu, then System preference, Accessibility and you will find it at the bottom right of the panel.
5. Assistive device
With a MAC, you are able to control it with ease using the assistive devices. The two main are;
(a) Switch control- It enables you to use adaptive devices in entering text and also eases the interaction with items on the screen.
(b) Dwell Control- It’s main purpose is enabling you to use tracking devices to control your mouse.
The two named controls are also used for controlling your Mac. To access assistive devices, just click on the Apple menu, System Preferences then Universal access and you will find the ‘enable access for assistive devices’ checkbox.
6. Keyboard Sticky keys
Sometimes it gets overwhelming having to use a combination of keys to make certain actions on your computer especially if you have a lot to do with that combination. One way of easing this is by enabling sticky keys on your Mac. When sticky keys are enabled, you can press keys sequentially rather than simultaneously. There are two main ways of enabling sticky keys;
(a) Click apple menu, system preferences then universal access. From here, click on keyboard and you will see the checkbox for sticky keys.
(b) This is the simpler method as you only have to press shift key five times and sticky will be turned on. Turning off is simply pressing the same key five times again.
7. Reducing Motion
Once in a while, you may find the motion on your screen a bit of an issue. To correct this, try reducing it when using features such as the dock and notification area. To do this, go to Apple menu, Select system preferences then Accessibility and click on display.
8. Moving mouse with the keyboard
This is one tool you will find useful if you find it hard to use the mouse. The option allows you to move the mouse using your keyboard. To activate it, click on Apple menu, then select System preference, Accessibility and select mouse and Trackpad.
We hope you enjoyed our overview of the built in accessibility tools on Mac OS X.
Book a DSA Needs Assessment
The post Accessibility Tools On Mac OS X appeared first on A2B Assessments DSA Needs Assessment Centre.
No comments:
Post a Comment